Schroth Exercises for Scoliosis
Exercises Are Tailored to Each Patient’s Curves and:
- Consist of a combination of stretching, strengthening, and breathing techniques
- Halt curve progression, eliminate pain, and improve posture — for life
- Can be done at home and as part of your daily life
"If I had not gotten to know the Schroth Method, I would have been dead long ago. I had such terrible back pain that I just barely survived in a body brace."
Sophie, a German patient
Schroth Therapy Follows a 3-Step Exercise Process:
1. First make the proper pelvis position corrections
2. Do spinal elongation and then rotational angular breathing (RAB) techniques to move spine and ribs into best possible posture
3. Tense the trunk muscles isometrically, in order to strengthen weak muscles and preserve the corrected posture
The Definitive Handbook
on Schroth Exercises

Written by Christa Lehnert-Schroth, P.T. this book includes:
- Over 100 scoliosis exercises – with photos
- Treatments for 3, as well as 4-curve configurations, which the author discovered, and which are actually more common than many doctors realize
- Exercises for Scheuermann’s kyphosis, flatback, hollow-back syndrome (hyperlordosis), lumbar kyphosis, spondylolisthesis, and related pathologies
Example: Exercises for 3-Curve, Right-Thoracic Scoliosis*
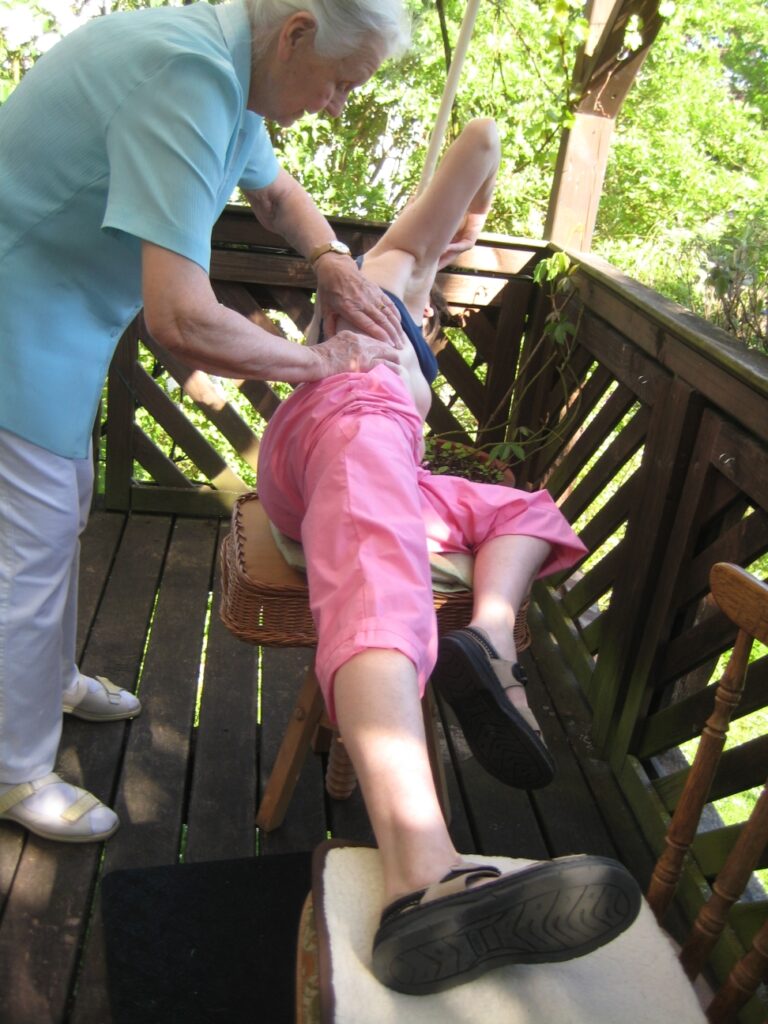
Christa Lehnert-Schroth assists Sophie, a longtime patient, with exercises tailored to her condition and aimed at correcting her pelvis position and derotating her spine.
While Sophie is a mature adult with a severe case, the Schroth method principles applied in her treatment are essentially the same as those that govern moderate and mild cases for children, adolescents, and young adults.
The goal of these and other scoliosis Schroth method exercises is to practice moving the body out of its unbalanced state, past the longitudinal axis towards the opposite side, until the brain is correctly reprogrammed and the patient is able to sit and stand straight upright.
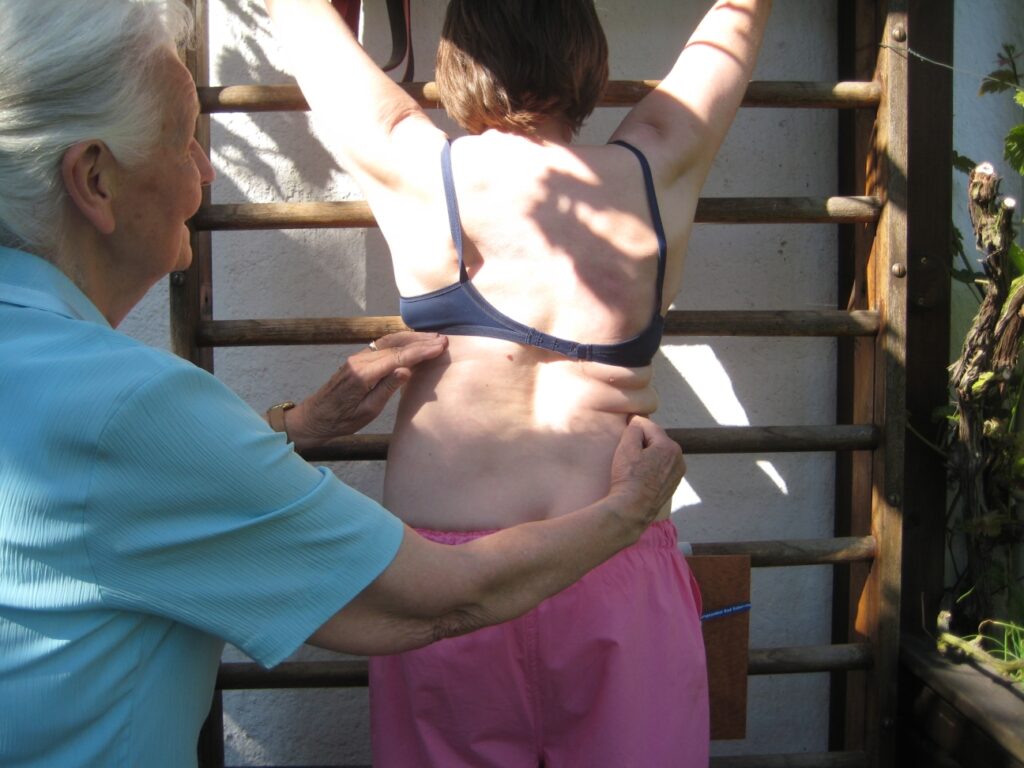
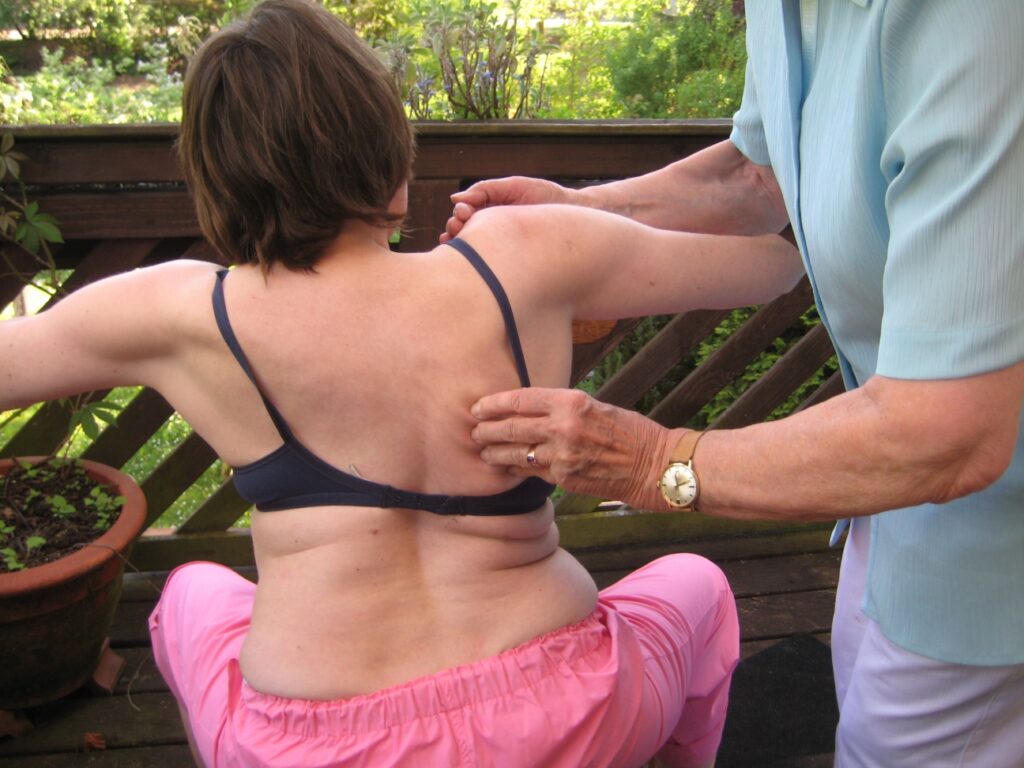
In the pictures above, we can clearly see several abnormal shifts that must be corrected. Sophie’s torso has shifted laterally. Her left hip has shifted out to the left, and the rib hump under her right shoulder has dropped. At the same time these two segments are twisted towards the rear.
In other words, she must practice the opposite of the positions that the body has pathologically adopted.
Sophie, and all Schroth patients, must breathe air into these from within, so that they become firm and tough in order effortlessly to carry the sections above them in the correction.
Overcorrection helps reverse deformities
A central Schroth concept of exercise is to reverse malposture by striving for the opposite of the defective form that the scoliotic body has assumed. The left hip of this patient must be drawn in towards the center of the torso, yet that does not suffice for a “repair.”
To reverse the defects, Sophie must practice overcorrecting the laterally-shifted sections beyond the midline.
This overcorrection can best be achieved by hanging sideways on wall bars like this:
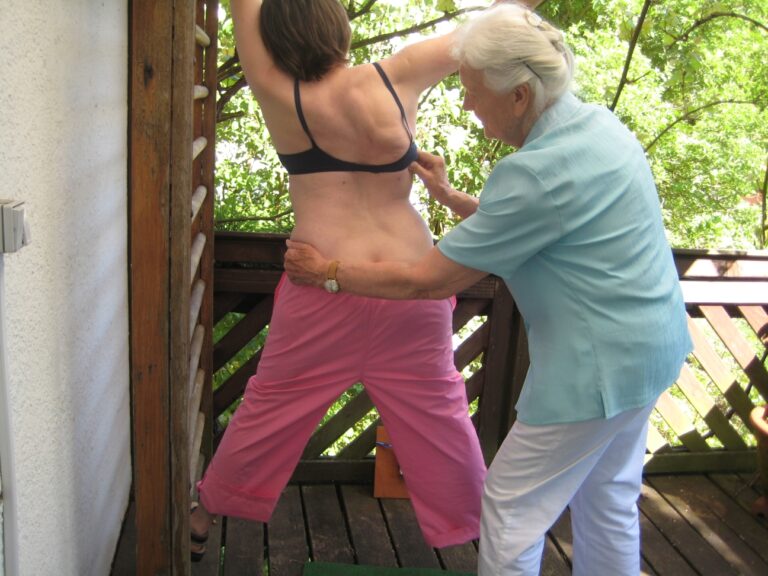
This is a good starting position for correcting faulty body positions: fixed pelvis, bent-knee position, and fixed hand position. It is important that the hands are on the same level, for then the shoulder girdle remains horizontal.
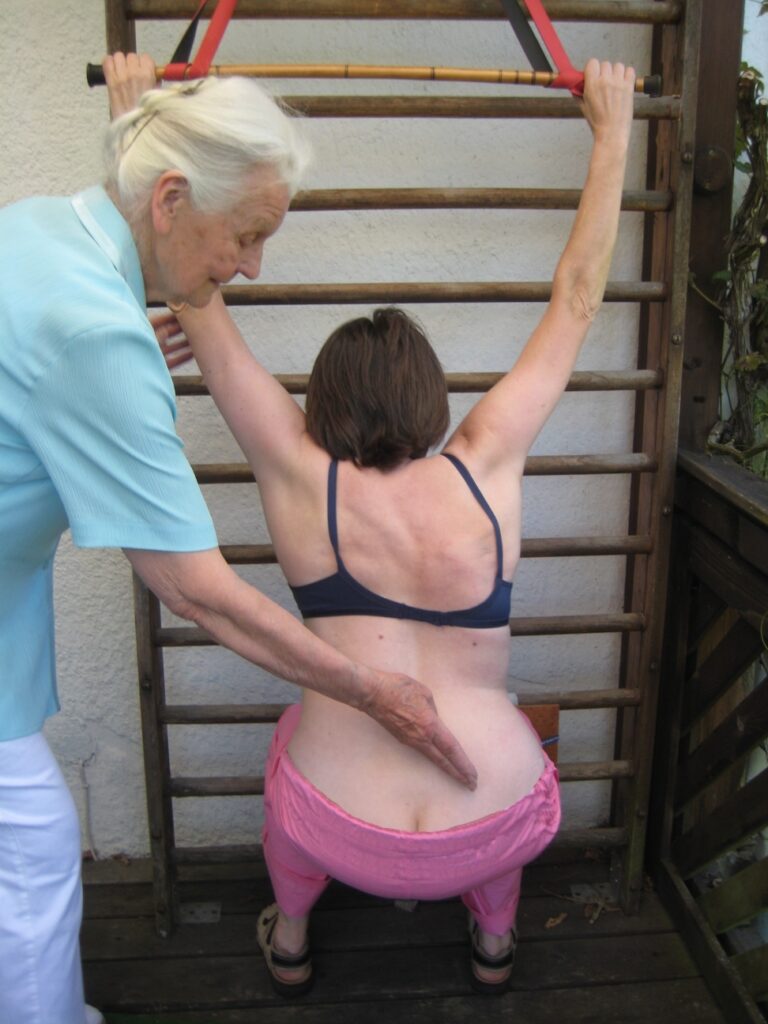
Sophie should keep her hands wide apart, which favors breathing in the upper chest. The horizontal bar above is affixed with rubber straps, which allow some elasticity in the exercise. (See also Fig. 300 in the book.) The right hip is twisted slightly backward by a cushion under the right knee.
Rotational angular breathing (RAB) aids derotation
The Schroth rotational-anglular breathing technique is applied to these sections. This special breathing technique helps from the inside to push the ribs outward like an expanding air cushion. This achieves firmness and solidity for the sections above them.
The working trapezius muscle, visible on Sophie’s left in the picture above, is pulling the main curve to the left. It begins at the spinous processes of the thoracic vertebrae, and would pull contortingly if the patient did not simultaneously intiate RAB (described in Part B of the book). This rotational breathing returns the vertebrae to their normal, untwisted position and widens and fills the concave side towards the back.
Stabilization follows corrective exercise
Here the patient could, for instance, pull the cane backwards, or attempt to “pull it apart” or to press the ends together — always with arms placed wide apart. Stabilization (isometric contraction) follows corrective positioning.
During such forceful exercises the patient must exhale to avoid compression on the larynx.
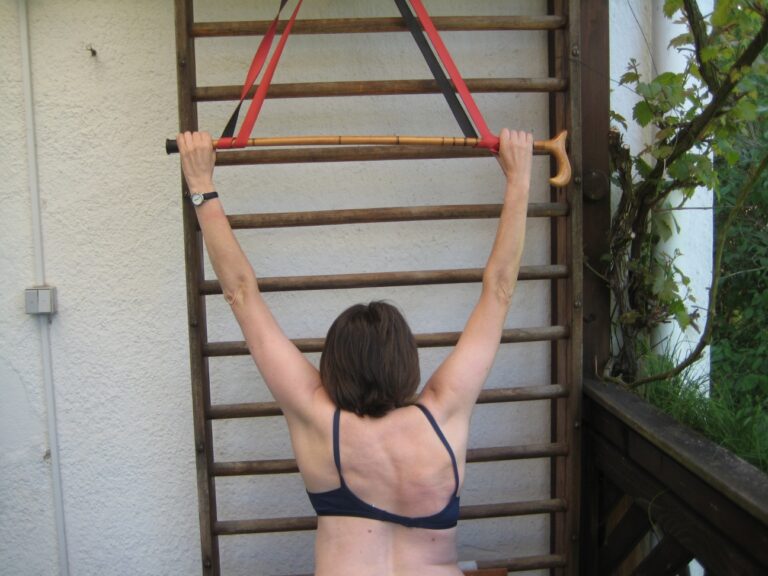
This is a countermovement, which must be trained partly with the help of a therapist and partly alone while monitoring oneself between two mirrors.
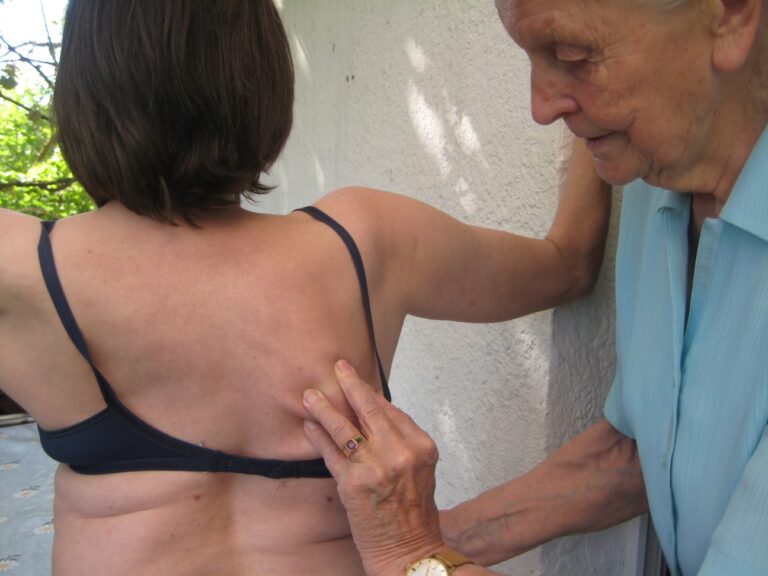
Manual coaching by the therapist helps the patient to find the necessary feeling in the body for the desired exercises.
Caution: Here, we should add that the hand on the rib hump side must not always grip higher. It depends upon the position of the upper body. If the torso is positioned vertically, gripping higher means cranially, which would move the shoulder girdle out of horizontal alignment. If the upper body is horizontal, gripping higher moves the arm and the shoulder girdle of this side backwards. (See Fig. 84 in the book.)
It is similar with leg and hip position. In the picture, Sophie kneels with a cushion (not visible in the photo) under her right knee. This moves her right hip back in relation to the rib hump, which must move forward. (See Fig. 80 in the book.)
When the patient is standing, there must be no cushion under this foot, since it would move the hips out of horizontal. Even while seated, no cushion must be placed under the pelvis on the rib hump side, since it would further compress the narrowed spot under the rib hump.
This exercise demonstrates how the body can be moved into a completely different position:
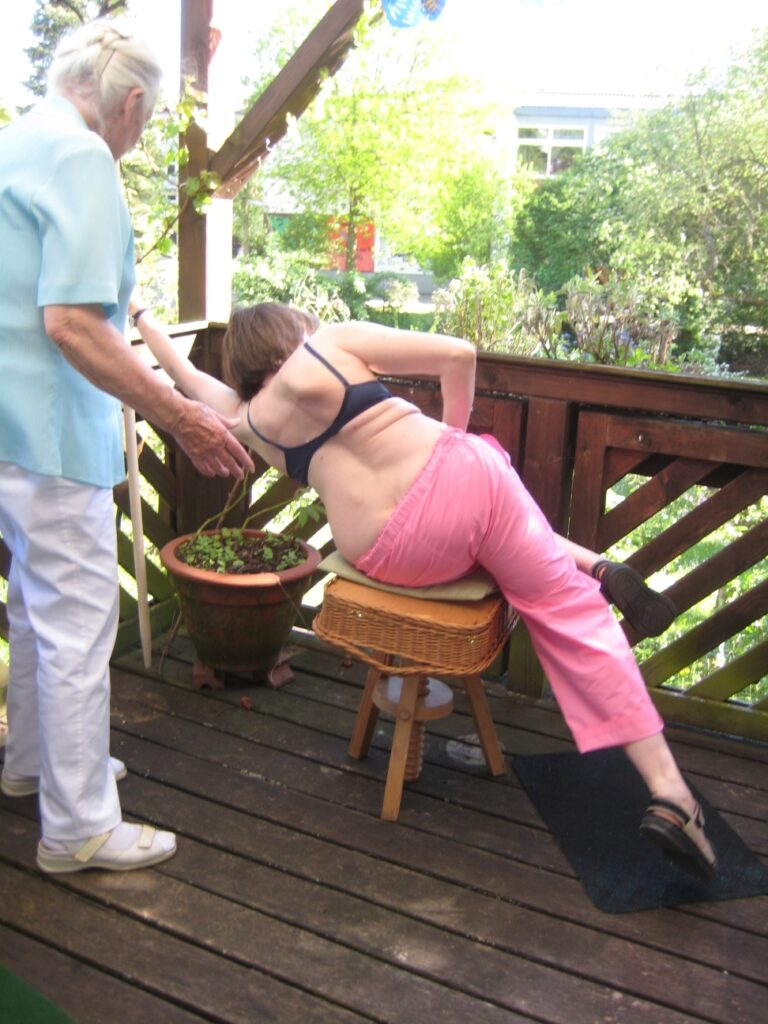
The right leg hangs downward, and the weak spot under the rib hump widens.
The patient pushes her right hip back with her hand, and thus creates a firm basis for the forward leveraging of the right rib hump.
Here the patient fixes her extended right leg, in a plane with the torso, to offer better support:
*Caveat: It is very important for the patient or therapist to determine whether particular Schroth treatment exercises described on this page, and in the book, are appropriate for the condition of a given patient. The exercises depicted here in Sophie’s example are for a three-curve, right-thoracic scoliosis. They cannot be adopted without alteration for a four-curve scoliosis, for instance, because in that case other static relationships are at work. See Part B, sections IV and VI of the book, which summarize the physical corrections necessary for three- and four-curve scolioses.
Find Out How the Schroth Method for Scoliosis Can Help You
Educate yourself on the exercises that therapists use to treat scoliosis
Additional Resources
Why Schroth Method?
- Reduces Pain
- Stops Curve Progression
- Increases Lung Capacity
Without the need for surgery.
Try Schroth Exercises first!
The information and links to therapists provided on this site are intended for informational purposes only. While we strive to ensure the accuracy and currency of our listings, we cannot guarantee that all information is up-to-date or that all therapists are currently accepting new clients. We strongly recommend that you perform your own due diligence by conducting a thorough Google search and verifying the credentials, availability, and suitability of any therapist you wish to contact. This site does not endorse or recommend any specific therapist and assumes no responsibility for the services provided by any listed professional. Your use of this site and reliance on any information provided is solely at your own risk.
